Wednesday, August 18, 2010

Baby Break

I should just call this blog the blog of testing recipes from the Gourmet cookbook. Really, that is all I seem to do these days. I try to branch out to new recipes, but the ones in that cookbook are simple enough for this working mom and have always proven to be pretty tasty. I'll just have to make more effort to do a more daring recipe from another cookbook, magazine, or blog.

Life has been busy, as you can only imagine. My little girl is growing up so fast and requires a lot of my time. I can't wait until she is old enough for us to cook together and enjoy what we cook. I'm already day dreaming of making cupcakes with her and teaching her all my favorite recipes.

The cookies below were a special treat I made to enjoy during the small moments I have to myself. It was the perfect match to my cup of coffee and quiet time when Miss R is napping. I like having the small mini cookies instead of bigger ones because I can eat more than one and not feel guilty about it!


Tiny Chocolate Chip Cookies
from The Gourmet Cookbook

1 1/4 sticks unsalted and softened butter
2/3 cup packed brown sugar
3/4 tsp salt
1/2 tsp baking soda
1 large egg
1/2 tsp vanilla extract
1 cup all-purpose flour
1 1/4 cups semisweet chocolate chip

Preheat oven to 400 degrees.

Beat butter, sugar, salt and baking soda together in a bowl until fluffy. Beat in egg and vanilla. Add flour and mix at a low speed until just combined. Fold in chocolate chips.

Drop a barely rounded 1/2 teaspoon of dough on to an ungreased baking sheet about 1 1/2 in. apart. Bake until golden brown, about 6-7 minutes. (NOTE: I only cooked it 5 minutes.)

Place on rack to cool.

Tuesday, June 22, 2010

Every Day Pasta

Can it be? Another cooking post so soon?

It is! I said I was going to try and be better about this whole thing and I am really attempting to be better. I always think that I should only post things that I made some sort of effort to make. However, who cares, right? Cooking ideas are cooking ideas, and since this blog is a record for me than I should put down easy ideas too.

The other night I made the pasta below. I am happy to note that it wasn't entirely jar sauce pasta. I did cheat and use a store bought pesto. I would feel slightly bad about it, but I know I can make pesto from scratch and the store bought was so much easier with baby around. This pasta took me about 15 minutes to make and it was yummy and nutritious (packed with veggies!). It will be a keeper and most likely added to our dinner routine.


Every Day Pesto Pasta

1/2 box of your favorite pasta (we love rigatoni in this house)
1/2 cup store bought pesto (or homemade if you have it)
1 zucchini, chopped into bite-size pieces
1 cup cherry tomatoes
1 1/2 cup fresh spinach
1 orange bell pepper, cut into bite-size pieces
3 oz mozzarella, cut into bite-size pieces

Cook noodles according to box directions. While noodles are cooking, saute zucchini, bell pepper, and cherry tomatoes with about a tbsp of olive oil until cooked through (but still a bit crisp and tomatoes are slightly blistered). Shut off heat, then add in pesto and spinach. Toss until coated. Once noodles are finished, add and toss in with veggie mix. If the pesto is too thick, you can always add a touch of pasta water to thin out the sauce. Add in moz pieces at the very end and serve.

Tuesday, June 15, 2010

Whoa baby!

So, I'm back (again). Yes, I know, I know...I've been a TERRIBLE blogger. There really hasn't been much food stuff to blog honestly. We've been eating boring stuff over and over again in this house. However, with our new little one, we're lucky to shovel down any food at all. Excuses aside, I'm going to try and start this cooking "business" all over again. No more tacos! No more frozen pizza! No more jar spaghetti sauce and noodles! HA! Just kidding! Those things will most likely stick around until this kid is in college, BUT I still want to be the mom who has some of the best food at her house. That means, I really need to get cooking again.

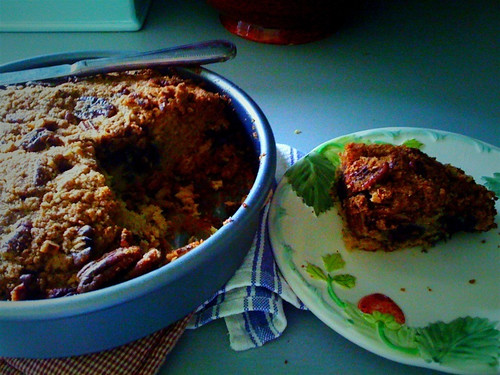
What did I make to welcome myself back to the world of cooking and food? Blueberry coffee cake! After looking at my last post, it seems that blueberries have been a thing for me. I actually happened to have a ton of blueberries in the fridge this past week and needed a good way to eat through them. Also, ever since the pregnancy, I've somehow gained a sweet tooth that never existed before. The coffee cake came out sooooo goooood! It was a perfect treat in the afternoon while Miss Ruby was taking her nap. The recipe is based from one in my wonderful Gourmet cookbook. I cut the white sugar used and added blueberries to the regular coffee cake recipe. I think other additions would be great too! Instead of blueberries, you can also add bananas, apples, pears, chocolate chips...all would be very tasty!

Also, the pics are from my iPhone. I do have a better camera now, but taking and uploading from the phone is just too easy to pass up now.


Blueberry Coffee Cake
adapted from The Gourmet Cookbook

2 1/2 cups all purpose flour
1 cup packed dark brown sugar
1/4 cup granulated sugar
1/2 tsp salt
2 sticks butter (cold, unsalted), cut into cubes
1 tsp cinnamon
1 1/2 pecans, toasted and chopped
1 cup sour cream
1 large egg
1 large egg yolk
1 tsp vanilla extract
1 tsp baking soda

Preheat oven to 350 degrees.

Mix together flour, 3/4 cup brown sugar, granulated sugar, and salt in a bowl. Blend in 1 1/2 sticks of butter with your fingers or with a pastry blender until the mixture looks like a course meal with small pieces of butter mixed through.

Transfer 3/4 of the mixture to another bowl and add cinnamon, remaining 1/2 stick of butter and remaining 1/4 cup brown sugar until crumbly. Add pecans and then refrigerate for 15 minutes. This is the topping.

In another bowl whisk together the wet ingredients- sour cream, egg, yolk, vanilla, baking soda. Add the remaining flour mixture until combined. Don't over stir! Batter will be sticky and stiff.

You can bake in a pan or in a muffin tin. Sprinkle the topping before baking. Bake until golden brown and center comes out clean. If doing muffins, bake about 20-30 minutes. If baking in a pan, it can take from 40-60 minutes depending on pan and your oven.

Cool for about 20 minutes before devouring!

Tuesday, January 26, 2010

Preggers Blueberry Muffins

I'm back...sort of!

Sorry I've been away. I've got a bucket of excuses, including the baby I'm growing and just being busy from work, but I'll just say that I will try my best to update this more often. I had good intentions when I posted last, but trying to keep up with two blogs is getting more difficult. I can only imagine how hard it will be when our little one comes in May!

Well, I really haven't been cooking much so there hasn't been much to post. Thus, when I got myself into the kitchen to make these muffins, I thought I should post it. I had a HUGE craving for blueberry muffins, and by luck I had a carton of blueberries in the refrigerator. This recipe was so easy and quick to make, and the muffins were VERY good!

I have a few more recipes from the last few months that I will try and post soon.


Blueberry Muffins
from The Gourmet Cookbook

Makes 12 muffins

3/4 stick (6 tbsp) of unsalted butter
1/3 cup milk
1 large egg
1 large egg yolk
3/4 tsp vanilla extract
1 1/2 cups of all purpose flour
3/4 cup sugar
1 1/2 tsp baking powder
3/4 tsp salt
2 cups (12 oz.) blueberries

For Topping:

3 tbsp cold unsalted butter, cut into 1/2 in cubes
1/2 cup all purpose flour
3 1/3 tbsp sugar

To make batter:
Preheat oven 375 degrees.

Melt butter in a small sauce pan over low heat. Then remove from heat. Whisk in milk, egg, yolk, and vanilla until well combined.

In a separate bowl, whisk together flour, sugar, baking powder, and salt. Add milk mixture and stir just until combined. Gently fold in blueberries.

Divide batter into 12 muffin cups.

Topping:

Prior to baking, combine all topping ingredients in a bowl and rub together with fingertips until crumbly. Sprinkle evenly over batter in cups.

Bake until golden and crisp and wooden pick inserted into center of muffin comes out clean- 18 to 20 minutes. Cool in pan on a rack for 15 minutes.

Monday, November 23, 2009

Changes are a-comin'!

So, it's been SOOOOOOO long since I've posted. It's been what...more than four months? I'm sorry dear internet for not posting (not that I have a long list of following fans) but there have been some changes in our little household. I'm about four months pregnant! Yes! Thus the lack of posting. With the first trimester blues, there hasn't been much cooking going on here. I was not only feeling sick most of the time, but extreme fatigue doesn't lend itself to much. We've been eating a lot of homemade pizza, jar sauce spaghetti (Newman's marinara is pretty good), and tacos. Very, very dull.

While I was going through some old photos, I did find one recipe I never posted! My brother and his lovely girlfriend gave me a vegetarian cookbook last Christmas. It has an absolutely delicious recipe for a very versatile peanut sauce. It is perfect for summer rolls or a quick dinner, which is what I used it for. At the time, I bought these beautiful Chinese eggplants from the farmers market. What better way to use them but in peanut noodles!

Hopefully this post will be start (again) of more to come!

Chinese Peanut Sauce
directly from The New Moosewood Cookbook

1/2 cup good peanut butter
1/2 cup hot water
2 tbs soy sauce
2 tbs sugar
3 medium cloves of garlic, minced
1 tsp cider vinegar
1 to 2 tbs minced fresh cilantro
cayenne to taste
salt to taste (if needed)

1) Place peanut butter in a small bowl. Add the hot water, and stir patiently with a spoon or a small whisk until uniformly mixed.

2) Stir in remaining ingredients and mix well. Cover tightly and refrigerate. Let it come to room temperature before serving.

for Peanut Noodles:

Toss peanut sauce with buckwheat (soba) noodles and your favorite veggies. I used sauteed Chinese eggplant, edamame, and roasted corn. It was very, very tasty!


Monday, July 20, 2009

Easy and Light for a Summer Evening

Lately, the hubby and I have been really trying to get life in order. We've been continuing to fix up the house, organize our "office" materials, exercise on a regular basis, and just get on a better routine. I think we've been pretty successful so far, but we still have a large amount to do. Unfortunately, there are just not enough weekends. I know you probably feel the same way.

However, there is always time for a peach crisp! After the scone-baking, I decided to make something a tad easier. This is a great dessert for a summer evening. It was quick, simple, and delicious (especially with a scoop of brown sugar ice cream)! You can probably use the same recipe with any fruit. Also, who doesn't love a peach crisp in an apple dish?


Summer Peach Crisp

1 bag of organic frozen peaches (or fresh if you have them)...you need enough to put a layer and a half at the bottom of your medim-sized baking dish
4 tbs of cold butter, diced, some to butter the dish
1/4 cup whole wheat flour
1/4 cup old fashion oats
1/4 cup brown sugar
1 tbs cinnamon
pinch of salt
sprinkle of ginger and curry powder

Butter a medium-sized baking dish. Add about a layer and a half of frozen peaches, enough to not really see the bottom of the pan. In a separate dish, mix flour, oats, brown sugar, cinnamon, ginger, curry powder, and salt. Sprinkle all over the top of the peaches. Lastly, add and evenly distribute the butter pieces to the top. Bake at 375 degrees for about 30-40 minutes, or until browned and bubbly. Serve warm with a dollop of ice cream.

Monday, June 29, 2009

Mishaps in Baking

So, just when I thought I was on a roll with my baking skills I end up with a small baking mishap. It wasn't TERRIBLE...I mean it was still edible. It just wasn't what it was supposed to be. I know enough about cooking that I can usually fix what I think went wrong. However, when it comes to baking I'm seriously at a loss. I am purely at the mercy of the recipe I'm following.

For instance, I've made scones before. I actually made them a lot in Boston and they came out perfect and delicious. The last two batches I've made were barely tolerable. (Well, that's harsh...they were just not SCONES). The first batch I made a few months ago I threw out in frustration since the dough was completely useless. This most recent batch was better but they did not come out crumbly. They came out a little like spongy biscuits. Maybe it was the use of whole wheat flour? Maybe Florida humidity is no match for the scone? I haven't given up quite yet, though. I'll be trying again soon. First, I have to finish this batch.


Basic Scones
from Domino Magazine

1 lb all-purpose flour (I used whole wheat flour.)
1/2 tsp salt
1/4 to 1/2 cup unsalted butter
4-6 level tsp baking powder
1 1/4 cups of whole milk

Preheat the oven to 425 degrees. Sift the flour and salt into a bowl. Cut the butter into little pieces, and rub into the flour with the tips of your fingers as quickly as you can. Sift in baking powder; combine. Add milk and mix lightly into a spongy dough. Knead very lightly to make the dough smooth and roll out 1/2" to 3/4"thick. Cut scones and let it stand for 10 minutes. Brush with egg or milk before placing on to a greased baking sheet. Bake in the middle of the oven for about 10 minutes, then let cool.